
Vue Js - Building To Do App
Vue (pronounced view) is a progressive framework for building user interfaces. Unlike other monolithic frameworks, Vue is designed from the ground up to be incrementally adoptable. The core library is focused on the view layer only, and is easy to pick up and integrate with other libraries or existing projects. On the other hand, Vue is also perfectly capable of powering sophisticated Single-Page Applications when used in combination with modern tooling and supporting libraries.
Vue is fresh and has little baggage. It has been learning from the mistakes and successes of React & Angular. The way we see it, Vue is lightweight & easy to learn. It is fresh and has little baggage. It has been learning from the mistakes and successes of React & Angular. The way we see it, Vue is lightweight & easy to learn.
Vue.js is a more flexible, less opinionated solution ( than Angular ). That allows you to structure your app the way you want it to be, instead of being forced to do everything the Angular way. It’s only an interface layer so you can use it as a light feature in pages instead of a full blown SPA.
Vue.js CLI
Lets Create a Simple To-do app POC on Vue Js CLI
Setup the Vue Js Environment
Download the Node Package Manager from Below link from node.js website
https://nodejs.org/en/download/
After completion of the installation of the Node Js
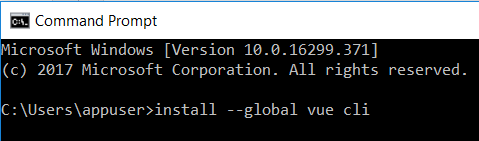
Open your CMD and install the Vue Js package from the node Manager
Enter the below command to install Vue Js libraries
“npm install --global Vue-cli”
Install Vue Js Library
After completing the installation
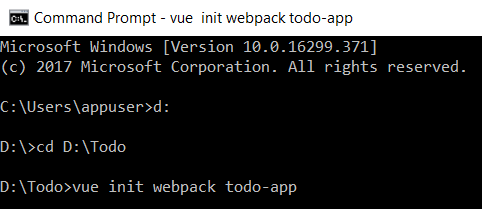
go to your desired folder where you want to create the Project
Example – I will create my project in D drive Todo folder
D:\Todo
There are Some templates available like below
The simplest possible Vue setup in a single HTML file
A full-featured Webpack + vue-loader setup with hot reload, linting, testing & css extraction
PWA template for vue-cli based on the webpack template
A simple Webpack + vue-loader setup for quick prototyping
A simple Browserify + vueify setup for quick prototyping
A full-featured Browserify + vueify setup with hot-reload, linting & unit testing
# create a new project using the "webpack" template
Enter the Below Command to create the Project .// “todo-app” is the project Name
“vue init webpack todo-app”
Create Your Vue Project
After the project get created you will get some instruction’s
Like enter the Project Name , Project Description , Author etc.
just follow as the bellow screen shot
Project Meta-data Setup

After authors Name it will ask you for install Vue related Components
Follow the instructions as below
Intructions

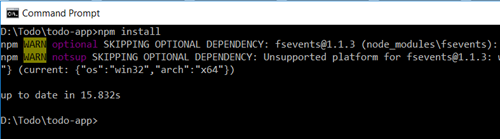
After finishing the steps go to the project folder
By writing the below command
“cd\todo-app”
Goto The Project Foolder

And then run a “npm install” command
Install Packages from Npm
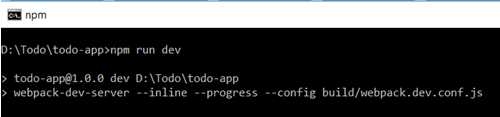
Now you can run the project to see what the webpack template of view consist
To run the project type the below command
“npm run dev”
Run the Project
When this command will execute it will run all the required Js file’s to run the project and after that it will show a window which will be you resultant window , which shows the information about the projects URL & compilation like below .
Now just go to the URL http://localhost:8080 hit in the browser
After Succesful Compilation
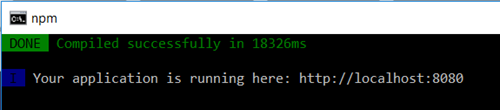
You will see the default page of the web pack template
Now just start to build your Todo App
Open Your Vue Project in the Editor(I would suggest to use a VS Code editor)
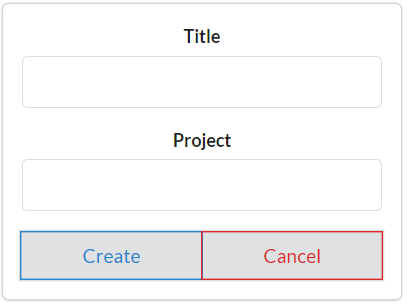
Now go to the Project Structure
It will be having the Structure like below
Project Folder Structure
Now in the Project Structure will be having a index.html
Which is the Master Layout page which acts like the app.component.html in angular 2
So we define only the layout of the project
One important thing in Vue is that view have this part in its file .
- Template (Which will consist your HTML things)
- Script (Which will consist of the Scripting Part )
- Style Script (Which will consist of the Styling of the HTML markup)
And we will go to the src folder which will be containing the component folder and the APP.vue file which behaves like a app.component.ts in angular 2/4.
Now Create Three Vue File’s or Components Files which will be Having your all the things in the todo app
First you have to Create a TodoList.vue
Which will consist of your Header part of the App & the Popups of the App
In details it will have the counts of the todo’s & it will have the Success & error popups
We will be using some custom popup’s or third party popup
Paste the Code in the TodoList.vue file
TodoList.vue
<template>
    <div>
      <p class="tasks">Completed Tasks: {{todos.filter(todo => {return todo.done === true}).length}}</p>
      <p class="tasks">Pending Tasks: {{todos.filter(todo => {return todo.done === false}).length}}</p>
      <todo v-on:delete-todo="deleteTodo" v-on:complete-todo="completeTodo" v-for="todo in todos" :todo.sync="todo"></todo>
    </div>
</template>

<script type = "text/javascript" >
    import sweetalert from 'sweetalert';
    import Todo from './Todo';

    export default {
    props: ['todos'],
    components: {
      Todo,
    },
    methods: {
      deleteTodo(todo) {
        sweetalert({
          title: 'Are you sure?',
          text: 'This To-Do will be permanently deleted!',
          type: 'warning',
          showCancelButton: true,
          confirmButtonColor: '#DD6B55',
          confirmButtonText: 'Yes, delete it!',
          closeOnConfirm: false,
        },
        () => {
          const todoIndex = this.todos.indexOf(todo);
          this.todos.splice(todoIndex, 1);
          sweetalert('Deleted!', 'Your To-Do has been deleted.', 'success');
        });
      },
      completeTodo(todo) {
        const todoIndex = this.todos.indexOf(todo);
        this.todos[todoIndex].done = true;
        sweetalert('Success!', 'To-Do completed!', 'success');
      },
    },
    };
</script>

<style scoped>
    p.tasks {
        text-align: center;
    }
</style>
Now we will create a another vue file Named Toto.vue which will be having the Form fields and button .
Which will add our todo task in the todo list .
For now we will be creating only two fields in todo app.
Title & Project .
Paste the Code below code in the Todo.vue file
Todo.vue
<template>
    <div class='ui centered card'>
      <div class="content" v-show="!isEditing">
        <div class='header'>
            {{ todo.title }}
        </div>
        <div class='meta'>
            {{ todo.project }}
        </div>
        <div class='extra content'>
            <span class='right floated edit icon' v-on:click="showForm">
            <i class='edit icon'></i>
          </span>
          <span class='right floated trash icon' v-on:click="deleteTodo(todo)">
            <i class='trash icon'></i>
          </span>
        </div>
      </div>
      <div class="content" v-show="isEditing">
        <div class='ui form'>
          <div class='field'>
            <label>Title</label>
            <input type='text' v-model="todo.title" >
          </div>
          <div class='field'>
            <label>Project</label>
            <input type='text' v-model="todo.project" >
          </div>
          <div class='ui two button attached buttons'>
            <button class='ui basic blue button' v-on:click="hideForm">
              Close X
            </button>
          </div>
        </div>
      </div>
      <div class='ui bottom attached green basic button' v-show="!isEditing &&todo.done" disabled>
          Completed
      </div>
      <div class='ui bottom attached red basic button' v-on:click="completeTodo(todo)" v-show="!isEditing && !todo.done">
          Pending
      </div>
    </div>
</template>

<script type="text/javascript">
    export default {
      props: ['todo'],
      data() {
        return {
          isEditing: false,
        };
      },
      methods: {
        completeTodo(todo) {
          this.$emit('complete-todo', todo);
        },
        deleteTodo(todo) {
          this.$emit('delete-todo', todo);
        },
        showForm() {
          this.isEditing = true;
        },
        hideForm() {
          this.isEditing = false;
        },
      },
    };
</script>
Now Create the Last Component of the todo project is a Createtodo.vue which will contain the main Todo app body.
This will have all the todo tasks listed in this page.
The template part will be having the the body containing part and the scripts section will be having the all pop & push functionality of the todo tasks lists.
Copy the below code into the Createtodo.vue file.
Createtodo.vue
<template>
    <div class='ui basic content center aligned segment'>
      <button class='ui basic button icon' v-on:click="openForm" v-show="!isCreating">
        <i class='plus icon'></i>
      </button>
      <div class='ui centered card' v-show="isCreating">
        <div class='content'>
          <div class='ui form'>
            <div class='field'>
              <label>Title</label>
              <input v-model="titleText" type='text'>
            </div>
            <div class='field'>
              <label>Project</label>
              <input v-model="projectText" type='text'>
            </div>
            <div class='ui two button attached buttons'>
              <button class='ui basic blue button' v-on:click="sendForm()">
                Create
              </button>
              <button class='ui basic red button' v-on:click="closeForm">
                Cancel
              </button>
            </div>
          </div>
        </div>
      </div>
    </div>
</template>

<script>
    export default {
        data() {
          return {
            titleText: '',
            projectText: '',
            isCreating: false,
          };
        },
    methods: {
      openForm() {
        this.isCreating = true;
      },
      closeForm() {
        this.isCreating = false;
      },
      sendForm() {
        if (this.titleText.length > 0 && this.projectText.length > 0) {
          const title = this.titleText;
          const project = this.projectText;
          this.$emit('create-todo', {
            title,
            project,
            done: false,
          });
          this.titleText = '';
          this.projectText = '';
          this.isCreating = false;
        }
      },
    },
  };
</script>
Now lets come to the last part which will be our App.vue
Now we have to import all the components into the app.vue.
App.vue will be having the main information about the todo app like title & information about it.
Copy the below code into the App.vue file.
App.vue
<template>
    <div id="app">
      <h1 class="ui dividing centered header">My Todo App</h1>
      <div class='ui three column centered grid'>
        <div class='column'>
          <todo-list v-bind:todos="todos"></todo-list>
          <create-todo v-on:create-todo="createTodo"></create-todo>
        </div>
      </div>
    </div>
</template>

<script>
  import sweetalert from 'sweetalert';
  import TodoList from './components/TodoList';
  import CreateTodo from './components/CreateTodo';

  export default {
    name: 'app',
    components: {
      TodoList,
      CreateTodo,
    },
    data() {
      return {
        todos: [{
          title: 'Todo A',
          project: 'Project A',
          done: false,
        }, {
          title: 'Todo B',
          project: 'Project B',
          done: true,
        }, {
          title: 'Todo C',
          project: 'Project C',
          done: false,
        }, {
          title: 'Todo D',
          project: 'Project D',
          done: false,
        },
        {
          title: 'Todo C',
          project: 'Project C',
          done: false,
        }],
      };
    },
    methods: {
      createTodo(newTodo) {
        this.todos.push(newTodo);
        sweetalert('Success!', 'To-Do created!', 'success');
      },
    },
  };
</script>
After making these files properly run the project into the CMD as per given command.
Make sure you don’t have extra Spaces in the file because the Vue js script section is Indentation Sensitive.
The Architecture of the Vue is same like the Angular 2 js .just it is not based on the MVC architecture totally.
We normally create the components & the main layout html that is it.
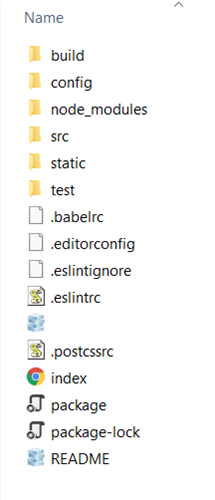
After running the project you will see the below screen.
This is not a dynamic todo app bcz it don’t have the DB or sme storage end.
Some Screen Shots of the Todo App here below.
My Todo App View
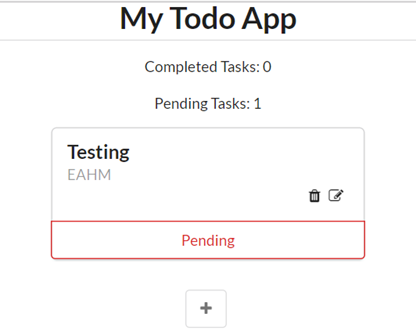
ON clicking on the + button you will get the below form popup
Add New Task View
Fill the form & create the new task in todo app
Successful Popup View
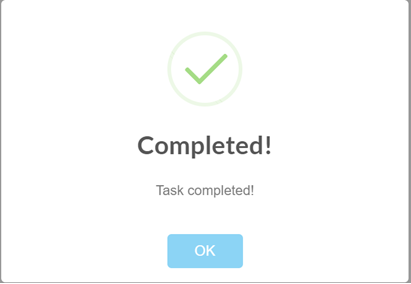
This will be the success popup when your task will be completed
Warning Popup View
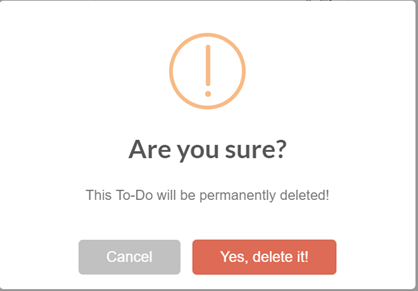
This will be a Warning Popup to Delete the Task
Successful Deletion View
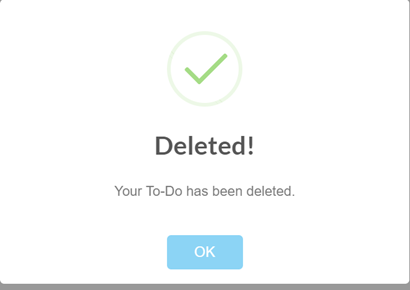
This will be a successful Deletion popup
The above were some screenshots of the todo app
All the best .Simplify your Code & Codify Your life .