Episerver HTML Helper Methods
When you work with EPiServer content data in MVC, the view does not have to take the content data object as view model. The received content data populates a view model that the view uses when a page loads. When a view uses a view model instead of the content data object, the edit view is unaware of connections between the properties on the view model and the properties on the content data object, which means that you cannot update parts of the page when you change content in the form edit view. However, you can use helper methods to show the correct data on the preview window.
HTML Helpers
A view contains the HTML for specifying the markup. HTML Helpers render property values based on their property type. Properties can be rendered as markup using the Html.PropertyFor() method. Using this, properties automatically become editable in edit view. Both ASP.NET MVC and EPiServer comes with a predefined set of Html.Helper methods to specify the HTML needed for the view. You can also create your own HTML Helpers.
The EPiServer shell framework contains the following HTML helper extension methods to create the built-in gadgets available on the dashboard.
Html.PropertyFor
The Html.PropertyFor methods are wrappers around Html.DisplayFor, which create connections between view model properties and content data properties in edit mode. In view mode, the PropertyFor directly calls DisplayFor, but in edit view a wrapping element is created around the property that contains a connection to a content data property (if a connection exist).
By default, the wrapping element is a div, but you can change the element by adding editepielementname to the list in additionalViewData (new { editepielementname = "span" }) in the overloads of PropertyFor, which contains additionalViewData.
@Html.PropertyFor(a => a.Title)
Html.FullRefreshPropertiesMetaData
The Html.FullRefreshPropertiesMetaData() extensions contains a method without any parameters (default) and another that takes an array of property names. The default method adds the properties in the ViewData collection for full refresh. The overload with the string array adds only the property names in the array for full refresh.
@Html.FullRefreshPropertiesMetaData('Parameters')
Html.BeginEditSection
The BeginEditSection and EndEditSection extension methods work as EditAttributes by adding attributes that are needed for editing.
Use the methods when you add attributes to a property that can contain nested properties (such as a block) or when you render a property that can be nested (such as a partial view for a block). BeginEditSection ensures that only the outer property get edit hints when there are nested properties.
When you render a block, the block property gets edit hints while the individual properties within the block do not get edit hints.
HTML.Raw
Html.Raw(string) approach, if you output an MvcHtmlString it will not be encoded. This can be useful when adding your own extensions to the HtmlHelper, or when returning a value from your view model that you know may contain html.
It is Used to render Data MvcHtmlString element without Html Markup or Tags init.
@Html.Raw(Model.Description)
Html.MenuList
This related to C# and MVC idioms and so much about EPiServer. In this particular case Func<TArg,TResult> is a function this may be passed in as argument to MenuList method. This function represents "some code block" that may be called later while generating menu.
In AlloyTech Func<> is actually generated by view engine - in this case Razor. In this case you are declare this helper method inline while calling to MenuList method. Is it more clear if you look at following code?
@helper RenderItem(HtmlHelpers.MenuItem item)
{
    <li class="@(item.Selected ? "active" : null)">
        @Html.PageLink(item.Page, null, new { @class = string.Join(" ", item.Page.GetThemeCssClassNames()) })
    </li>
}
and then:
@Html.MenuList(ContentReference.StartPage, RenderItem)
Html.PageLink
The simplest and most common way to create a link to page is to use EPiServer's Html.PageLink helper. Using this helper, you can pass in a PageData object, a PageReference, or even a LinkItem, and it will create an HTML anchor, using the clean, friendly URL to the page. For the text of the link, if you do not supply it with a text string, it will use the PageNameproperty for the page (or the Text property for a LinkItem object).
@Html.PageLink(Model.SomePageReference)
@Html.PageLink(Model.SomePageData)
@Html.PageLink("A link to a page", Model.SomeLinkItem)
You can also pass in route data information that can change the URL (helpful when working with language branches) or additional HTML attributes to add to the anchor tag.
Html.AcceptButton()
Renders a localized submit input button.
Example:
<% Html.BeginGadgetForm("accept"); %>
    <div class="epi-buttonContainer-simple">
        <input type="text" name="text" />
        <%= Html.AcceptButton() %>
    </div>
<% Html.EndForm(); %>
Html.AutoUpdate()
Refreshes a view periodically.
Example:
<%= Html.AutoUpdate(TimeSpan.FromSeconds(5)) %>
Html.BeginGadgetForm()
When you save data on the dashboard, use AJAX instead of posting and re-creating the whole dashboard.
Example :
<% Html.BeginGadgetForm("accept"); %>
    <input type="text" name="text" />
    <input type="submit" />
<% Html.EndForm(); %>
Html.CancelButton()
Renders an input button that calls the specified action to restore the view.
Example:
<div class="epi-buttonContainer-simple">
    <%= Html.CancelButton(null, new { action="someview"})%>
</div>
Html.GetGadgetId()
Gets the current gadget’s Id and returns it as a string.
Example:
<%= Html.GetGadgetId() %>
Html.SetGadgetFeedback()
Add text to the gadget title bar area with an extension method. The extension overload allows options for AJAX loader, fadeout and disappear after.
Example:
<%= Html.SetGadgetFeedback("feedback message"); %>
Html.ViewInputButton()
Creates an input button that loads the specified view in the gadget content area using AJAX.
Example (this extension has gained some overloads since 6RC):
<%= Html.ViewInputButton("View input button", "title", "someview", string.Empty, null, new { test = 2, test2 = Guid.NewGuid() })%>
Html.ViewLink()
Creates an anchor that loads the specified view in the gadget content area using AJAX. This is useful in master-details scenarios.
Example:
<%= Html.ViewLink("View link", "title", "someview", string.Empty, null, new { test = 3, test2 = Guid.NewGuid() })%>
Html.ViewLinkButton()
Creates an anchor with the appearance of a button that loads the specified view in the gadget content area using AJAX.
Example :
<%= Html.ViewLinkButton("View link button", "title", "someview", string.Empty, null, new { test = 4, test2 = Guid.NewGuid() })%>
Using labeled inputs for gadgets
Because inputs used in gadgets can have multiple instances present at the same time, you cannot use static values for Ids. One of the important usages for an Id on inputs is to connect it with a label using the “for” attribute. The following HTML helpers assist with generating labels:
- LabeledCheckBox
- LabeledDropDownList
- LabeledPassword
- LabeledRadioButton
- LabeledTextArea
- LabeledTextBox
Example:
<%= Html.LabeledTextBox("inputName", "Label 1", "input value", new { @class = "epi-size15" }, null) %>

Generates an output like this:

<label for="id545">Label 1</label>
<input name="inputName" class="epi-size15" id="id545" type="text" value="input value" />
Html.BeginForm
Html.BeginForm is an extension method that writes an opening "<form>" tag to the response. "BeginForm" is an extension method for both HtmlHelper and AjaxHelper classes. It returns an MVCForm object from both HtmlHelper and AjaxHelper class instances .
Html.BeginForm() method to create a form. The BeginForm() method is an extension method of the HtmlHelper class that writes an opening "<form>" tag and it also calls the "Dispose()" method that writes a closing "</form>" tag. Because the MvcForm class implements the IDisposable interface, we can call the Dispose() method of the IDisposable interface to dispose of the MvcForm class object. We create an MvcFrom as in the following:
@{
MvcForm mvcForm = Html.BeginForm();
<div>My Html Form</div>
mvcForm.Dispose();
}
And that code renders in the opening "<form>" and closing "</form>" tags on the browser when it's loaded. We get the source code in the browser as in the following:
<form action="/Product/ProductHtml" method="post">
    <div>My Html Form</div>
</form>
Html.DropDownList
The Html.DropDownList() method generates a select element with specified name, list items and html attributes.
Html.BeginForm() method to create a Dropdown. The DropDownList () method is an extension method of the HtmlHelper class that writes an opening "<Select>" .
Html Helper Code:
@Html.DropDownList("StudentGender",
new SelectList(Enum.GetValues(typeof(Gender))), "Select Gender", new { @class = "form-control" })
Html Result:
<select class="form-control" id="StudentGender" name="StudentGender">
    <option>Select Gender</option>
    <option>Male</option>
    <option>Female</option>
</select>
Html.EditAttributes
The EditAttributes extension methods add attributes to an existing element, which makes the content in the element connected to a property on the content data object in edit view, by specifying the content data object property to which the element connects.
While PropertyFor is the primary intended way to render properties when building EPiServer templates using MVC there's nothing that says that we have to use it. We're free to render properties of content objects such as PageData or BlockData, or properties of view models, however we want.
When doing so it's up to us to add the attributes the CMS needs to identify editable properties in preview/on-page-edit mode. To do that we can use the HTML helper extension EditAttributes. Using that method we feed it an expression which specifies a given property on the model in the view and it spits out whatever attributes the CMS needs on its wrapping element.
Here's a simple example:
<h1 @Html.EditAttributes(x => x.Heading)>@Model.Heading</h1>
Html.DisplayFor
The Html.Display() is a loosely typed method which generates a string in razor view for the specified property of model.
Display() method Signature: MvcHtmlString Display(string expression)
Display() method has many overloads. Please visit MSDN to know all the overloads of Display() method
Example: Html.Display() in Razor View
@Html.Display("StudentName")
Html Result:
"Steve"
Html.Translate
Now you can translate blocks and their folders in the same way as for pages with the option Show All Languages for the shared blocks gadget. This option will show blocks and folders for all languages. Not translated blocks have a language code representing the fallback language, when this is turned off only blocks and folders that are available for the current language will be shown.
To access localization data from the front-end view (in our case, using Razor), We use the Translate helper, which is a provided EPiServer MVC HTML helper:
@Html.Translate("/sometemplate/somevalue")
This provides us the translated value from the CMS to the View ,
You could also use the TranslateFallback helper, which will return a supplied fallback string if no match is found:
@Html.TranslateFallback("sometemplate/somemissingvalue", "Missing a translation")
Html. CanonicalLink
The Html.CanonicalLink() is HTML helper Method ,Which renders a canonical link element for the current context.It Renders a canonical link element for the provided parameters.Html.CanonicalLink & Html.AlternateLinks both are same as in working there is not much change in it.
Html.CanonicalLink(“Parameters”)
Html. RequiredClientResources
It is a Html Helper Method which ,Renders required client resources for specified area.
Like Example Required client resources for Header area should be rendered inside <head> tag. Required resources for Footer area should be rendered in the bottom of the page, before closing </body> tag. Usually to specify the Area fro specific element we use Html.RequiredClientResources(“Header”).
Html.RenderPartial
This method result will be directly written to the HTTP response stream means it used the same TextWriter object as used in the current webpage/template.
This method returns void.
Simple to use and no need to create any action.
RenderPartial method is useful when the displaying data in the partial view is already in the corresponding view model.For example : In a blog to show comments of an article, we would like to use RenderPartial method since an article information with comments are already populated in the view model.
@{Html.RenderPartial("_Comments");}
Html.RenderEPiServerQuickNavigator
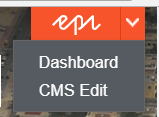
When you log into the editor with a user, it should pop-up in your site as long as you've added the Render tag in your layout:
@Html.RenderEPiServerQuickNavigator()
It provides the quick edit small menu to the right side named as "Epi"
You can see in the below image